Featured

Chalk and Notch Fringe Dress – Have you tried hacking yours yet?

Sew My Style is a year long sewing challenge which gets you to try a new pattern each month. It is hosted by Jessica Lorraine and you can find the information here. It’s up to you whether you complete the monthly project and I’ve made more projects than I have skipped. On the whole the projects will work with a variety of body shapes. The September project is the Chalk and Notch Fringe Dress.

Pattern Description:

The Fringe Dress is pull on dress or top with grown on sleeves with a gathered skirt. There are two options for necklines, a button placket or a sculpted neckline.

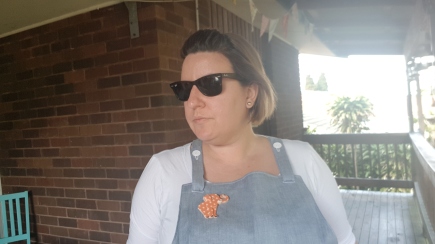
I’ve made the dress before and I haven’t work it much (mostly because I need to take it up a little). I thought I’d make a top version and knew I wanted to make one with a big waist tie and a few ruffles.

It was a really easy hack to achieve.

Pattern Sizing:

The pattern comes in Sizes 0 – 18

Fabric Used:

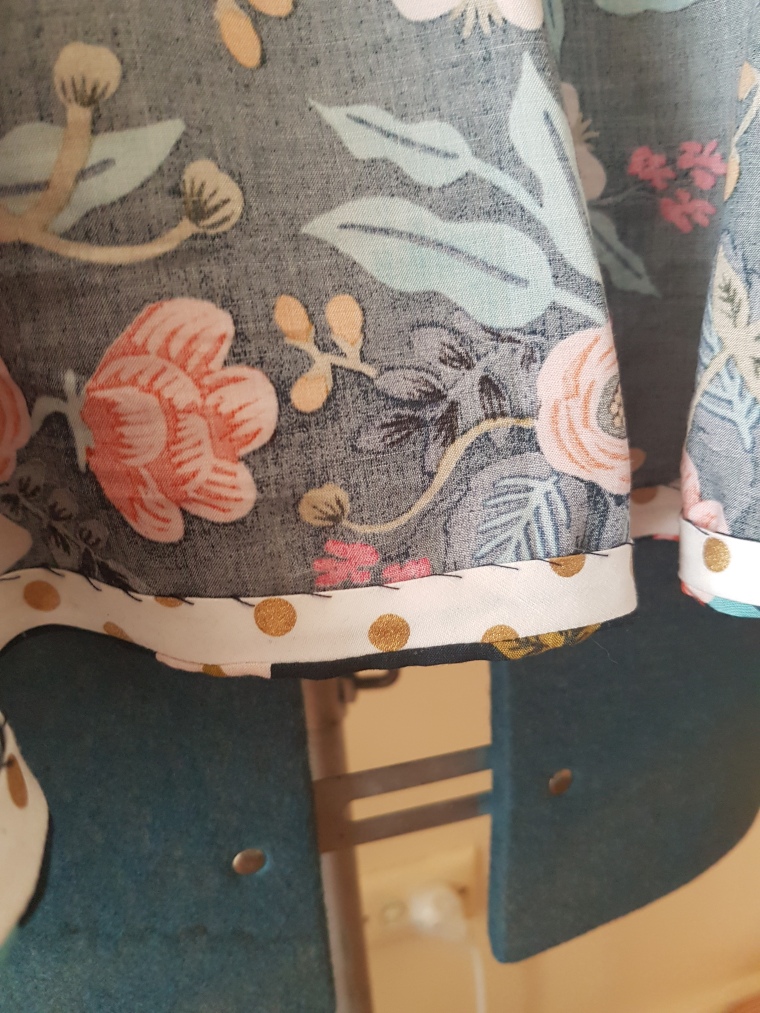
I’ve previously made it the Rifle Paper Co Cotton & Steel Fabric nearly everyone has used. This time I shopped my stash and came up with a red floral poplin I got from a destash group on Facebook.

I still have a decent size piece left over.

Did it look like the photo/drawing on the pattern envelope once you were done sewing with it?

Well once I finished hacking it there was still some semblance to the original pattern. If you stick to the original pattern pieces it is true to description.

Were the instructions easy to follow?

The instructions were clearly written and the drawings help make things even clearer. I followed the instructions and it came together pretty quickly – I had it sewn up in an afternoon.

I would suggest taking your time when putting the neck facing on.

Pattern alterations or any design changes you made:

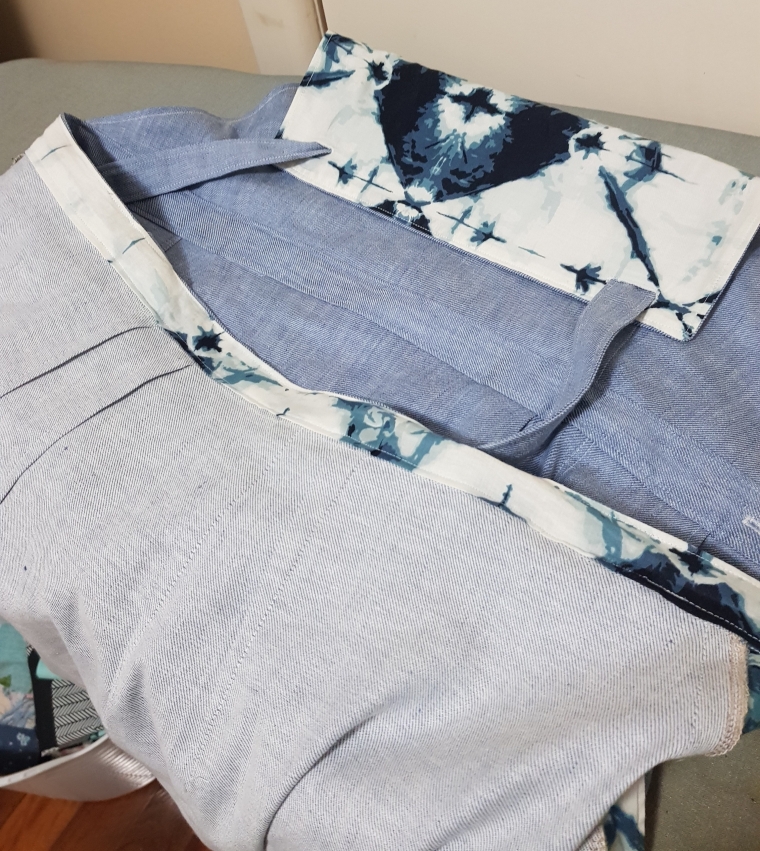
For the sleeves I cut out the normal sleeve piece and the cuff. I extended the cuff piece by 2 inches. I inserted the sleeve piece without folding it in accordance with the instructions which meant the sleeve was twice as long and then gathered the cuff piece and attached it to the sleeve hem.

For the waist ties I cut 6 of the large tie piece. I joined two pieces together to form the two ties and the finished them in accordance with the instructions. Instead of inserting them into the back dart I added them to the waist seams to sit where my natural waist is.

The remaining two pieces were used to form the ruffle on the bottom of the skirt piece. Instead of cutting it with a curved hem I levelled it off.

What did you particularly like or dislike about the pattern?

To make the pattern fit I had to grade up a size which was pretty easy to do. This was mostly to accommodate my bust. I didn’t worry too much about the skirt piece as it was a top and the gathering gives plenty of room to move. I also didn’t need to add any extra room to the sleeve and I like how loose they sit.

I”m really happy with the fit and how comfortable it is to wear. The only thing I am not sure about is the ruffle on the bottom. I just can’t be bothered to change so it will stay for now.

It is designed as quite lose fitting by adding the ties it helped cinch it in a bit.

Other great versions can be found at?

Bettina reviewed the pattern for the Curvy Sewing Collective

http://curvysewingcollective.com/review-chalk-and-notchs-fringe-blouse-and-dress/

Meg at Cookin and Craftin

http://cookinandcraftin.blogspot.com/2017/08/testing-testing-chalk-and-notch-fringe.html

Chalk and Notch have just done a series on hacking the Fringe Dress

https://www.chalkandnotch.com/blog/

Conclusion:

I’m hoping to get a bit of wear out of it with the upcoming summer party season with jeans and a nice sandal or heel.

Follow my blog with Bloglovin


Featured

Whats better than one dress? – two dresses in one …

This is a post a year in the making. Last summer my go to dress was the Sew Liberated Metamorphic Dress. I lived in it and have even worn it a lot layered this winter.

Pattern Description:

The dress is a sleeveless dress with a gathered skirt which is reversible. One layer has a curved hem and the other is straight across. I loved the first one so much I made a second.

Metamorphic_croquis (1).jpg
Drawing from Sew Liberated

Pattern Sizing:

The pattern comes in sizes 0 – 24 and I made a size 22 bodice with a size 24 skirt.

Fabric Used:

In my first version I used a dark grey cotton slub and black rayon. In my second version I used an Art Gallery Voile with a Navy Rayon. I used about 2 metres of each fabric and still had some leftovers.

Did it look like the photo/drawing on the pattern envelope once you were done sewing with it?

Yes. There aren’t a lot of pieces to it and it was as imagined. I may consider making a longer version.

Were the instructions easy to follow?

Super easy to follow. The two dresses are joined at the bodice using the burrito method and it was the first time I had used the method and it came up a treat. There is also a YouTube Video to help visual learners here.

What did you particularly like or dislike about the pattern?

I loved how easy it is to style and how you can dress it up or down. All of Meg from Sew Liberated’s pieces are designed to mix and match and layer.

Pattern alterations or any design changes you made:

I cut the straps and neckline as an 18 to accommodate a hollow chest and it worked a treat.

I would potentially lengthen the skirt a little more.

Would you sew it again? Would you recommend it to others?

I have and I will.

Other great versions can be found at?

Meg from Sew Liberated has a drool worthy collection

http://sewliberated.typepad.com/

Andrea from Drea Renee Knits

http://www.dreareneeknits.com/blog/2017/11/15/handmade-wardrobe-metamorphic-dress

Fancy Tiger Crafts

https://fancytigercrafts.com/blogs/projects/jaime-and-rae-make-metamorphic

Conclusion:

A summer wardrobe staple I couldn’t live without.

Featured

What do you do with your scraps???

My collection of bias binding.

The thing about dressmaking is you end up with scraps, lots of them.

For me I think of anything around 50 cm a scrap. I, as a general rule, only sew for myself and there are only a couple of patterns in my arsenal that takes a metre or less.

Contrasting bias binding on the hem

The thought of throwing the scraps out seems like such a waste. We don’t have a textile recycling drop off point anywhere near my hometown so I have started to get creative to use them up.

Contrasting bias binding on my Cashmerette Springfield

The most common thing I do with larger pieces is turning it into bias binding. I prefer to use a contrasting or coordinating bias to finish my garments and it has slowly become my go to finish with hems and necklines. I also found it great to finish the neckline on my Tilly and the Buttons Coco Dress which I made in a ponte.

Contrasting bias binding on my Grainline Farrow Dress

I haven’t taught myself the seamless bias technique and I usually have lots of odd shaped pieces so I join my pieces all together. This works really well with thinner fabrics like lawn or a poplin. I’ve also tried with a drill and cotton sateen and they are best with a wider binding. It gives a quirky touch to your garments which I love.

The best tips I have is to use a bias binding tool (I got mine off ebay) and iron it with the fold side facing the ironing board.  I roll mine up as I iron which helps keep it neat and tidy.

Contrasting Bias hem on a dress

There are several great tutorials around but a couple can be found here:

http://www.jenniferlaurenvintage.com/2013/05/tutorial-how-to-make-bias-binding.html

https://blog.colettehq.com/tutorials/continuous-bias-tape-tutorial

Like a lot of people I have a pocket obsession I put them in all my dresses and I prefer to use a contrasting fabric for pockets and facings. I have recently used scrap fabric to line the bibs of my Pippi Pinafore and my Jenny Overalls.

Coordinated contrasting lining on my Closet Case Jenny Overalls


Scrap lining on my Pippi Pinafore

I have been meaning to cut a whole heap of pockets out to have a pocket stash. Then I can have very different pockets in my dresses.

I have also used scraps to make some clothes for nephew. Tiny human clothes take a lot less and it makes for a nice gift.

My nephews Christmas present 2017

But the biggest use of my scrap fabric has been my quilt project. I started it in October 2017 and do a bit each Tuesday at a Quilting class. Every now and then I do a bit at home.

It will be double sided and the back is being pieced using the jelly roll race technique.

A jelly roll race quilt I made for a colleague

Putting it all together is like having a momento of all the different projects I’ve worked on. It will probably take me another year to quilt it.

Its king size and perfect to prevent the great evening blanket war that occurs when you have two side sleepers.

Anyway these are some of the things I do to use my scraps. Sadly it hasn’t really made a great dent but it does make me feel like I am getting the best out of my fabric.

The Love to Sew Podcast have mentioned what to do with scraps on a few episodes so thats a great resource.

Follow my blog with Bloglovin

Featured

What do you put in the pockets of your Arenite Pants?

20180421_091653.jpg

Pattern Description:

The Arenite Pants are from the talented Meg from Sew Liberated.  I’ve made a few of her patterns and I’ve loved the results each time.

The Arenite Pants are ‘deep-pocketed, slouchy pants of your dreams. Incredibly versatile and amazingly cozy, you can wear these high-waisted pants for date night, in the office, or as pajamas‘”.

Pattern Sizing:

Meg’s patterns have a very inclusive size range from 0 – 24.  I made the size 24 and added a little extra for the hips.  I cut the elastic the length of size 22 to account for the difference between my hips and waist.

Fabric Used:

I made these up in a silky feeling viscose twill from The Remnant Warehouse.  It’s still in stock and you can check it out here.

Soft Viscose Twill- Dazzling Blue

The fabric is absolutely gorgeous, drapes beautifully, extremely soft feel. With a slight sheen to it.  I bought 4 metres originally but I only used a little over 2 metres.  The rest I am saving for an ogden cami and hopefully a gypsum skirt so that I can mix and match outfits.

Did it look like the photo/drawing on the pattern envelope once you were done sewing with it?

Yes.  I made them soon after the pattern was released and I wasn’t sure if they would really suit me but I was determined to make them.  Luckily that fear was a moot point.

20180421_091816

Were the instructions easy to follow?

The instructions are really clear.  The pants are predominately sewed with flat felled seams which was a new technique for me.  The instructions held my hands throughout the whole process.

I love the drawings which help you through the process. Sometimes photos can confuse the process but these just guide you through.  It is a good idea to slow down and take your time when assembling the pockets.

What did you particularly like or dislike about the pattern?

POCKETS!!! They have amazing pockets.  Like the majority of people I love pockets.  These pockets exceed expectations.  I was worried that they may make my hips seem larger than they appear but to me it feels like the complete opposite.

Pattern alterations or any design changes you made:

Due to the freying of my fabric I ended up switching techniques to overlock then stitch it down.  Next time I plan on following the pattern.

I may give myself a little room in the crotch next time.

20180421_091856

Would you sew it again? Would you recommend it to others?

I have a floral rayon version in my head.  Which remind me of a pair Penny wore in the early seasons of the Big Bang Theory – back when they were all single.

Other great versions can be found at?

Meg from Cookin and Craftin

Beth from Sew DIY

Megan from The Green Violet

Conclusion:

Dressy Secret pj’s with pockets of dreams.


<a href=”https://www.bloglovin.com/blog/19152195/?claim=uyzkp2kpekv”>Follow my blog with Bloglovin</a>

Featured

A Kielo Wrap dress is it for work or play?

20180724_081703.jpg20180721_135610.jpg

Pattern Description:

The Kielo Wrap Dress by Named Clothing is a wrap dress designed for either knits or wovens.  There is also a free expansion pack to add sleeves.  Its a popular pattern which has been reviewed a lot.  It wasn’t until I saw a midi version with sleeves that I knew I had to make it.

Pattern Sizing:

The pattern comes in sizes UK 4 – 18.  I’ve inserted the sizing chart to explain why I choose the size I did.

My measurements are 115 cm bust, 104 cm waist, 134 cm high waist and 143 cm low waist.  These put me well out of the range included in this pattern.

I read a lot of reviews, but the most help was Manju which is found here.  We had similar body types and I just cut out the largest size with the sleeve add ons.

20180724_081705
Fabric Used:

I picked up a grey marle jersey and a geometric print knit from the Pitt Trading winter sale.  The fabric was dispatched super quickly and was beautiful to work with.


Did it look like the photo/drawing on the pattern envelope once you were done sewing with it?

Yes – It meet with my expectations.  It’s well photographed and published online so I had seen quite a few versions.

20180721_135627

Were the instructions easy to follow?

I didn’t really follow the instructions.  I read them initially then did my own thing.  The construction process is pretty straightforward and there wasn’t anything out of the ordinary to the process.

What did you particularly like or dislike about the pattern?

I really wished that there was bigger size range but I love how my dress turned out.  I’m certainly not confident to try it in a woven.

20180721_135431
Pattern alterations or any design changes you made:

I added a neckband.  I hate a turned knit neckline.  I used a method I picked up which is to cut the neckband at 75% of your measured neckline.

I also shortened the pattern by 30 cm to make the dress more versatile.

Would you sew it again? Would you recommend it to others?

I’ve made two versions and I would love to make a bright and funky sleeveless version for summer.

Other great versions can be found at?

Manju at Sew Manju

Rumana at The Little Pomegranate 

Jenny at Byrdie Couture
Conclusion:

A dress to take from work to play or even a big lunch.

20180721_135518

Featured

By George! I’ve found the perfect office cami – A review of The Wearable Studio’s Canary Cami

IMG_20180819_101832_109

I did receive a copy of this pattern for free in exchange for me testing it and providing feedback. All opinions are my own.

I really enjoy pattern testing and when Mel from The Wearable Studio was looking for pattern testers I thought ‘I can do that’. I like giving back by pattern testing when I can and particularly love that Mel is a fellow Australian.

Pattern Description:

The Canary Cami is a twist on the traditional cami.

When I first saw the line drawings I wasn’t sure it was going to suit me but any doubts were gone when I put it on.

It has a centre front and a centre back piece and two side pieces to form shaping around the bust and the sleeve.

It is a pdf download and there aren’t a lot of pattern pieces so it is pretty quick to put together.

Pattern Sizing:

The pattern comes in sizes 6 – 18. I made the 18 but added a few centimetres to the hips to accommodate my pear shape. The pattern is drafted for a C cup and whilst I am a D cup I took a gamble and didn’t add any to the bust. This turned out to be a good call.

20180730_145000

Fabric Used:

I used about 80 cm of 150 cm of Barbie Pink Crepe from The Remnant Warehouse. I bought 2 metres a few years ago and made a top for work and had heaps left over. I loved that I can wash and hang it so I don’t have to iron it.

Whilst the pattern asks for self made bias binding for the finishing at the neck and sleeve I love a contrast binding and raided my stash for some I had made earlier.

I tend to make bias binding en mass when I get a few leftovers pieces that will work. I hate wasting fabric and this is the best way to use it and I love a contrast detail.

20180730_144746

Did it look like the photo/drawing on the pattern envelope once you were done sewing with it?

I really loved the finish garment. It looked like the line drawing.

20180730_144957

Were the instructions easy to follow?

The instructions were super easy to follow – there aren’t a lot of steps.

But they are clearly written and beginner friendly.

I found that I preferred to finish the sleeve by inserting the bias binding in the round. I also notched the centre front and back seams then overlocked them.

20180730_144940

What did you particularly like or dislike about the pattern?

I really like the shape and the amount of fabric you can get this out of. Great for using those left over pieces.

I did wish that the seam allowance was a little bigger so that I could have french seamed it but that’s an alteration I can make next time.

20180730_144731

Pattern alterations or any design changes you made:

Other than grading out at the hip I made it straight from the packet.

20180819_180014

Would you sew it again? Would you recommend it to others?

Yes – I already have. In some more crepe from The Remnant Warehouse which is also no longer available.

I work in a semi conservative office. Bare shoulders aren’t super appropriate apart from during summer.

This cami is a perfect addition to my work wardrobe and fits comfortably under my suit jacket.

Conclusion:

Would it be wrong to make more than 10?

Featured

Is there such a thing as too many overalls?

Is there such a thing as too many overalls?

20180802_141840

In the last year I’ve made two Tilly & The Button’s Cleo dresses, a pair of Sew House Seven Burnside Bibs, a self drafted pinafore dress using the Sewaholic Hollyburn Skirt.  When I saw the Pippi Pinafore by the wonderful Jennifer Lauren Handmade I knew I had to have it.   I really loved the shaping of the skirt and the fact there were options for cup sizes.  I’ve pattern tested for Jennifer before and I know she makes amazing patterns.

Pattern Description:

The Pippi Pinafore is a overall dress with an A-line skirt and fitted bib.  It is available as a pdf with the option to print at home or on A0 size sheets.  There are two big lined pockets and the bib is lined.  The best bit about most of Jennifer’s patterns are that she offers different cup sizes and you can choose either an A, B,C or D.

I bought the pattern on release day and had it printed using Officeworks online printing service.   I live in a regional area in Australia and I’m not that patient to wait for a pattern to arrive in the post so I buy my indie patterns as pdf.  To save time in taping patterns together I use my local Officeworks to print patterns on AO.  Despite having the pattern it took me a while to work out what fabric I wanted to make it out of.

Fabric Used:

Light Blue Linen Blend Stretch Denim

I found a beautiful light blue denim/linen blend from The Remnant Warehouse.  This fabric is leftover stock from Australian designers Bec + Bridge.  I like that I can do my bit for the environment but using leftover stock (the amazing girls at the Love to Sew Podcast have a few episodes about sustainable sewing check them out here).

In real life the fabric has a beautiful colour and the linen makes it quite soft and easy to work with.

I lined the inside of bib with Art Gallery Voile leftover from a previous project.  I had enough leftover to line the bib and pockets and make some bias binding for the hem.

20180801_194602.jpg

Pattern Sizing:

The pattern is available in size 6 – 24 with A, B, C, D cup sizes.  I did a size 22 D for the bib and a 22 waistband and graded out to a size 24 with an extra inch for the skirt.

I ran the gauntlet and made it up without making a muslin.

20180802_141819.jpg

Did it look like the photo/drawing on the pattern envelope once you were done sewing with it?

It was pretty spot on.  I have a different body type to Jennifer and the drawings so I wasn’t expecting to be exact.  The final version exceeded my expectations.

20180802_141914.jpg

Were the instructions easy to follow?

The instructions were really clear to follow.  I had never done a button closure but I had it inserted without any issues.

I made a user error and put the straps on the back to front so I had to unpick the waistband and reattach them so that the angle was facing the right way.

20180802_141856
Excuse the wrinkles it is a linen blend afterall

What did you particularly like or dislike about the pattern?

I really love the shape of the design, it feels a lot more grown up than other overall dresses around.  I like that you could dress it up or down depending on what you pair with it.

The darts and pleats make the skirt really flattering on a curvy figure.

What made this even easier was that I didn’t have to grade or tweak the pattern too much to be able to sew it – gotta love those wide size ranges.

20180802_141912.jpg

Pattern alterations or any design changes you made:

To fit the back properly I added two small darts at the back to take into account my sway back. I also added a little the length and used a bias binding to hem it so I could extend the length.

Next time round I may consider taking some length out of the bib to accommodate my short waist.

20180802_142016

Would you sew it again? Would you recommend it to others?

Absolutely I may have even found this cute embroidered cord from Spotlight to make a second one.

20180802_142039.jpg

Conclusion:

A grown up overall dress perfect for my inner 90’s child.

20180802_142019.jpg

My First Ogden Cami in Rifle Paper Co Rayon

The True Bias, Ogden Cami has been around for a while.  It’s a classic shape.  I picked it up together with a copy of the Emerson Pants.  I recently realised that I need more separates in my wardrobe.  This was a start.

I wasn’t sure how I would go as being quite pear shape my measurements fit at the bust but needed quite a bit of grading to cover my hips.  I did a wearable muslin and was pleasantly surprised at the result.

I have loved the Rifle Paper Co Rayon since I saw it on the blog.  I was looking at the Wattle Hill website and found just enough for an Ogden Cami there.  When the fabric arrived I was not disappointed.  It felt so soft and luxurious.

It arrived just in time for a long weekend where I had set aside a few days for sewing and very little else.

I probably should have slashed and spread over the whole of the garment but I just graded it out at the hips.  Next time I will try the slash and spread method.

I didn’t quite have enough fabric to get the back facing out in one piece.  I cut it separately and joined the piece with a french seam.

20170901_175514.jpg

I was very careful with my seams and french seamed the insides.  I love the finer details.

I cannot fault the instructions, everything was explained so clearly.  I loved the pictures.

I make my own bias binding and wanted to use a contrasting bias on the hem and to finish off the facings.

I added the bias binding and finished it by hand.

20170908_073747

I am going to make another one of these or ten.  I can understand while everyone is crazy for the pattern.

On the must try list is making a nightgown out of this.  It would be perfect for summer, especially with a Helen’s Closet Suki Kimono.

Sam

My Aussie Sewing Favorites

As a regional sewer I don’t have the luxury of having access to a huge amount of fabric and tools in my home town.

The easiest solution is to look online.  Sometimes it takes a bit of digging.  For my own sanity I’m putting my list here.

My preference for Aussie retailers comes from the cost of postage.  Some places want to charge $50 to post to Australia from overseas.  Which I accept is the actual cost but I can’t afford to pay it.

This is by no means an exhaustive list of retailers and sources but these are ones that I have used.  I also like to buy from smaller retailers where I can.

I haven’t included Spotlight and Lincraft – mostly cause most people know about them.

Booby Traps

Stocks, as the name may suggest, a wide selection of lingerie supplies and patterns.  They have patterns for all different sizes and different types of bras and lingerie.

Booktopia – Crafts

Whilst not a stockist of fabric or haberdashery I have bought quite a few sewing books. They stock Gertie’s books, Tilly and the Buttons and The Fit for Real People series.   They also offer Afterpay.

Ebony Craft

Ebony Craft stock a pretty good range threads, zips, ribbons and trims.  They are really speedy with the delivery and cheap with their prices.

The Fabric Store

Whilst the Fabric Store is from New Zealand, they have stores in Australia and a grand online store.  They stock a lot of natural fibre fabrics and liberty prints.  I am particularly fond of their range of jersey.

Indie Stitches

If you love the indie patterns like me then this is the place to go.  They stock a wide range of independent designers.  It helps reduce on shipping costs, which lets be honest no one likes to pay.

Megan Nielsen

Megan Nielsen has an absolutely divine range of patterns.  They are available in both pdf and paper.  Her Flint trousers are on my must sew list when I get over my fear of grading trousers.  The Matilda dress is also on my list.

The Quilters Store

Whilst this is primarily a stockiest of quilting fabric they stock my favourite Australian fabric Gertrude Made, Outback Wife.  The service is fantastic.  They have a big range with some good sales.

The Remnant Warehouse

I’ve ordered a few times from the Remnant Warehouse and have never been disappointed.  They are my first port of call when looking for fabric. They have a good collection of knits and wovens.  They also stock natural fibers and their prices are fantastic.  They also offer a sample service for $1 per sample.  Their postage rates are also pretty good with a flat rate for the first 10 metres.

Sew Squirrel

Sew Squirrel is a stockist of lingerie supplies.  They stock patterns, kits, fabric and notion.   The also let you curate your wish list and offer a flat rate for postage.

Style Arc

Style Arc has a massive range of patterns, both pdf and paper.  They cater for both hemispheres.   Their size range is pretty wide range of sizes.

Tessuti Fabrics

Tessuti stock the most luxe fabrics.  Their range is beautiful.  The downside is they are pricey but you get quality fabric.  They also have a pretty good range of haberdashery.

In addition to a great range of fabrics they also have their own range of patterns.

Wattle Hill Fabrics

Wattle Hill Fabrics stock a good range of quilting cottons, rayons and knits.  They stock Art Gallery, Cotton and Steel and Ella Blue Fabrics.  Another plus is that they offer Afterpay (if you are from Australia and haven’t heard about it find the info here).


This list is not by any means exhaustive and I’d love to hear any more suggestions from you.  I have focused on online retailers – because it’s easier for me to access.


Sam

Wedding Guest Attire

My older brother got married in August 2016.  So I am quite a bit late with this review of my outfit.

August in Sydney is still pretty chilly, its still winter.  Most of the wedding was outside and I really feel the cold so I wanted to make a jacket and dress.  After some ummming and aahhing I decided on these patterns.


Vogue 8615 for the Dress and Butterick B6105 for the Jacket

I originally had a mottled red print in mind for the dress with the idea of making a plum coloured jacket to pick out the plum tones in the print.  No matter how high or low I searched I couldn’t find any fabric that would be just right.

I eventually settled on a navy cotton sateen from Spotlight (it can be found here).  The jacket was made from some rose gold brocade I had in my stash.  I picked it up from Spotlight during a sale when you received an additional 50% off if you bought more than 3 metres.  In the end it was cheap and pretty. Unfortunately, it’s not available anymore.

I lined the bodice with some lining fabric I bought off eBay.

The dress came together pretty easily.  I didn’t any adjustments at all and just sewing it up.  I was really happy with the results.  On the night, I did find that I had trouble keeping it on my shoulders so I will definitely fix that next time but it’s not overly noticeable.

20160813_175056 (1)
Sam and I

There is a sizeable amount of fabric in the skirt which is a really full circle skirt. I hemmed he skirt by hand and finished it with bias binding.

20160813_174122.jpg

The jacket wasn’t as easy as the dress to put together.  The fabric freys a lot.  I lined the jacket in a satin fabric which was pretty slippery.

Afterwards it was pointed out that I had put the sleeves on the wrong sizes.  I haven’t had time or the inclination to fix it as I would have to pull it all apart and it isn’t all that noticeable.

Fit wise I found the jacket a bit big.  It’s better than being small but it just fits loosely when it shouldn’t.  So word of warning size down if you are considering making your own.

20160808_200947.jpg


The wedding was great fun and I didn’t take many photos but here’s what I have.

20160813_175117.jpg

20160813_175103

Sam